- 3 Node NSX-T Manager Cluster with a VIP.
- NSX-T Data Center 3.1.3.3
- Alma Linux 9 VM to store nightly backups via SFTP.
NSX-T Manager Backups – Crontab to Prune Old Logs
Unlike the VCSA, you can not configure the NSX-T Manager backups to only keep X days/weeks worth, which will fill up the disk drive on the remote SFTP server.
Document the current backup folders on the SFTP server.
/home/nsxt/backups/cluster-node-backups/3.1.3.3.0.18844962-f5221742-d892-29ad-3f94-66c292bf2c2e-192.168.0.251/ Folders with the backup date and time.
/home/nsxt/backups/inventory-summary/3.1.3.3.0.18844962-e5771742-edc1-4f75-e876-9ffce4b8ae69-192.168.0.252 is full of .json Files.

- The structure is Version-UUID-IP
Notice the IP address and UUID are different. This means the crontab will need to have 6 lines since we can never know which of the 3 NSX-T Manager nodes is performing the backup. - SSH into any of the 3 NSX-T Managers and run: get cluster status
Record the UUID and IP’s of the 3 nodes as these will be used for the command line to delete.
f5221742-d892-29ad-3f94-66c292bf2c2e – 192.168.0.251
e5771742-edc1-4f75-e876-9ffce4b8ae69 – 192.168.0.252
fee71742-3a42-5ad5-5b29-1c1da71ca7d0 – 192.168.0.253

- Setup Crontab to remove backups that are older then 2 weeks each day at 4am on the Alma Linux VM.
- The following will run daily at 4am on the SFTP server for any of the json and backup folders that are older then 14 days.
- You can run the find command by hand to validate the list of files and folders that are in scope for that day.
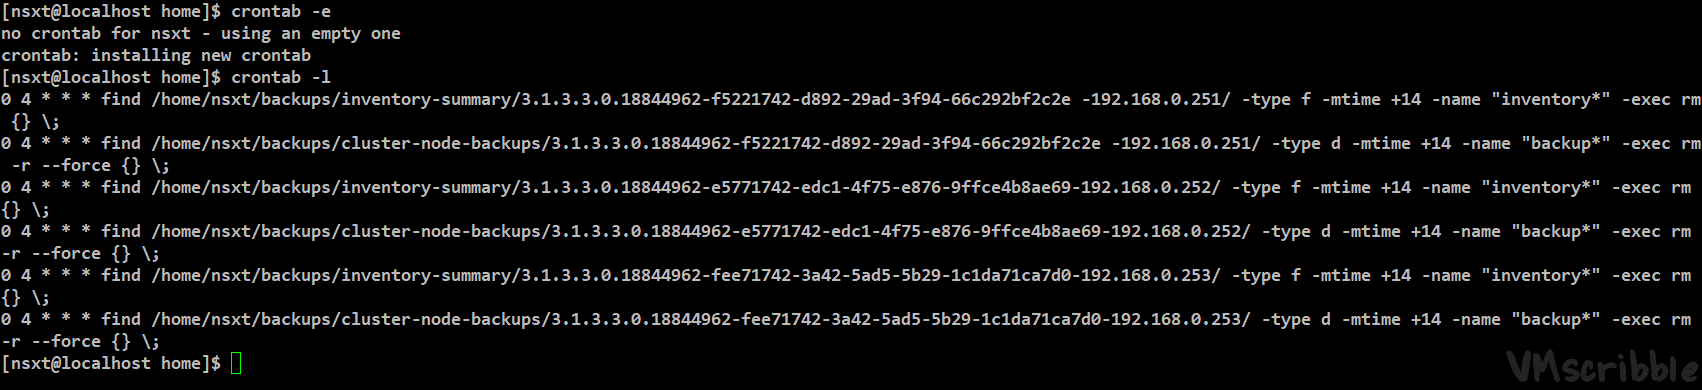
- SSH into the SFTP and run crontab -e (you may need to sudo to a user that has permission to run based on how locked down the user is)
- Ensure the UUID matchs the IP address from the last section. Validate with command: crontab -l
0 4 * * * find /home/nsxt/backups/inventory-summary/3.1.3.3.0.18844962-f5221742-d892-29ad-3f94-66c292bf2c2e -192.168.0.251/ -type f -mtime +14 -name "inventory*" -exec rm {} \;
0 4 * * * find /home/nsxt/backups/cluster-node-backups/3.1.3.3.0.18844962-f5221742-d892-29ad-3f94-66c292bf2c2e -192.168.0.251/ -type d -mtime +14 -name "backup*" -exec rm -r --force {} \;
0 4 * * * find /home/nsxt/backups/inventory-summary/3.1.3.3.0.18844962-e5771742-edc1-4f75-e876-9ffce4b8ae69-192.168.0.252/ -type f -mtime +14 -name "inventory*" -exec rm {} \;
0 4 * * * find /home/nsxt/backups/cluster-node-backups/3.1.3.3.0.18844962-e5771742-edc1-4f75-e876-9ffce4b8ae69-192.168.0.252/ -type d -mtime +14 -name "backup*" -exec rm -r --force {} \;
0 4 * * * find /home/nsxt/backups/inventory-summary/3.1.3.3.0.18844962-fee71742-3a42-5ad5-5b29-1c1da71ca7d0-192.168.0.253/ -type f -mtime +14 -name "inventory*" -exec rm {} \;
0 4 * * * find /home/nsxt/backups/cluster-node-backups/3.1.3.3.0.18844962-fee71742-3a42-5ad5-5b29-1c1da71ca7d0-192.168.0.253/ -type d -mtime +14 -name "backup*" -exec rm -r --force {} \;- If you perform an update or upgrade, you will need to edit the 6 lines with the new version.
- This is the same number that is in the file, so you can plan ahead.
VMware-NSX-upgrade-bundle-3.2.1.0.0.19801959.mub
ls -lah /home/nsxt/backups/inventory-summary/
3.1.3.3.0.18844962-e5771742-edc1-4f75-e876-9ffce4b8ae69-192.168.0.252
3.2.1.0.0.19801963-f5221742-d892-29ad-3f94-66c292bf2c2e-192.168.0.251
